PLEASE VOTE HERE!
No account to sign up for, just put five stars on #1! You can vote every day until November 20, 2013. Thank you!
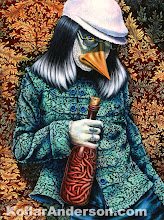
With Mystery Build, everyone starts with the same materials and theme. From there it is up to you and the only thing you can add is paint! This is my creation...
 Wandering Wonder
by Amy Kollar Anderson for
Re-Invent a Work of Art (2013)
Inspiration Piece: "Salome"
Inspiration Artist: Alphonse Mucha

Want to see how it was created?

My kit arrives and I get to see what I have to work with on this project.

A nice assortment!

Tobin inspects the materials.

I began the piece by scavenging materials. You can even use the box the supplies come in.

Squirrel away anything you think you might use, cause that is all you get and you never know what complications you will encounter!

Ti thinks I am nuts, but this is my idea of FUN!

Rope offers so many possibilities!

The beginning of her hair.

Taking apart the canvas board, my concept sketch in the back.

Removing the cardboard and soaking the back to reveal the primed canvas.


On the floor, getting into it now!

My work station.

Starting the wire armature.

Holes are drilled to start the harp.

I am one of those sickos that really likes the jewelers saw!

Starting the rings for her hair by wrapping the wire around one of the dowel rods.

I had to change the scale, which meant making a second harp! Argh!

Turning blocks into rocks with a jig saw! Probably not the safest thing to do!

Rocks!

Taking the rope, cutting, covering with glue for shoe laces.

Work it, you sexy wire lady, you!

Starting to paint.

Connecting the rocks with dowel rods.

Building up the figure and the basics go together.

Covering the wire in the Sculpty clay. I did this because I did not think I would have enough of the oil base clay. This was a mistake because after firing the Sculpty hard, it made adjusting the figured later really a pain in the butt!

Just weird.

Building up the oil based clay.

She is starting to take shape.

I liked the idea of her wearing clunky, big red boots!

Painting her skin.

Painting her hair.

Nice butt!

Pulling canvas "strings" for the harp.

Painting her face.

Starting to glue on her hair.

Inserting the shoe laces.

Gluing them in place.

Taming that wild mane!

Harp is coming together. Using Friendly Plastics for the beads.

I also made the decorations on her belt from Friendly Plastics.

Some landscape elements that did not make it to the final piece.

Starting the base of her belt/skirt.

Her belt, hair and chain loops.

That has got to hurt!

More saw action!

Friendly Plastics are not being friendly! I had to abandon this element.

Tracing the background.

Transferring those to the canvas I removed in the beginning.

Background painted and ready for the panels to be cut out.

Panels applied.

Drew dots for the background.

Making paper pulp.

Applying paper pulp strips to her head.

Glued paper strips for her dress, canvas detail, hoop earrings going in.

Using foam blocks to cover the rocks.

Mmmm...mossy!

Final gluing.

Last paint details
FINISHED!
PLEASE VOTE HERE!
No account to sign up for, just put five stars on #1! You can vote every day until November 20, 2013. Thank you!